Sending Encrypted Mail using Thunderbird
How to send encrypted mail to a known recipient
Let’s first address the elephant in the room: Gmail.
Almost everybody you know uses Gmail as their primary mail address. Gmail offers various “services” like smart-reply, which can be rephrased to say that Gmail reads your damn email. It has processed billions of emails to come up with a model which outputs near-perfect replies. Impressive tech, but as always, convenience at the cost of privacy.
There are many options for encrypting email, and we need a solution which really guarantees that the message we type is not read by anybody else other than the intended recipient. For this purpose, we will be using an email client which supports encryption. Why an email client? Because Gmail doesn’t provide any native solution where Google doesn’t read our email. Of course, there are other providers like ProtonMail, but let’s address the elephant in the room for now. I will be using Thunderbird as our email client. Thunderbird is a free and open-source email client which can be run on Windows, Mac and Linux. It supports end-to-end encryption using the OpenPGP standard, which we will be using.
How to encrypt messages(or anything else)
This is a topic which can get quite complicated, but let’s just keep it simple. We need to generate a key-pair using the OpenPGP standard. There are various implementations of the OpenPGP standard including GnuPG, but to keep things simple, we’ll be generating a key-pair using Thunderbird client itself.
How are messages encrypted using the key-pair? The key-pair includes a private key and a public key. A message intended for a particular recipient should be encrypted using the recipient’s public key. The resulting bits of information can only be decrypted using the recipient’s private key, which only the recipient will have. I hope that was simple enough. If somebody wants to send me an encrypted message, they have to encrypt the message using my public key which I have shared. Using this method only I can decrypt the message, and not the platform used to send the email, like Gmail for instance.
That’s as much of the rabbit hole we’ll be going down today, as far as encryption is concerned. As you can imagine, managing and securing your key-pair is a vast topic, many of the intricacies I am not touching upon here.
Once the key-pair is generated, the sender and the recipient have to exchange public keys. The public key of the recipient can be imported in Thunderbird, and we’re good to send encrypted mails.
Note: You can understand how important it is to keep our private key secure. The private key itself will be password protected, but still we have to be very careful with how we store our private key. I personally store mine inside a keypass database, but there are even better solutions.
You might also be wondering, “How come I’m hearing about key-pairs for the first time, even when I’ve been using end-to-end encrypted platforms like Signal?” Keep in mind that most such platforms have some sort of arrangement for storing the users’ keys. We are bascially trusting the providers with our key-pairs, and hoping that they wouldn’t do something spooky. The best approach would be to have control over our keys, which we are discussing here.
Step-by-Step Guide on configuring Thunderbird and adding keys
Let’s get to it. For this tutorial, let’s get a Gmail account added to Thunderbird and setup encryption.
Step 1: Install Thunderbird
Windows users can download the executable and install the application, while Linux users can use the package manager in their distribution of choice or use the Software application provided by the desktop environment. I’ve never used Mac to be honest, but the Mac version is listed in the Downloads page. Check out the Mozilla support page for installing on Mac.
Step 2: Configure App passwords in Gmail
Google doesn’t make it easy to setup SMTP and IMAP access to Gmail. After trying out a couple of options, I saw that configuring App passwords is the best option with other email clients like Thunderbird or K-9 Mail.
Navigate to “Manage your Google Account” in Gmail, and then to “Security” -> “Signing in to Google” -> “App Passwords”
Go ahead and create an app password for Thunderbird.
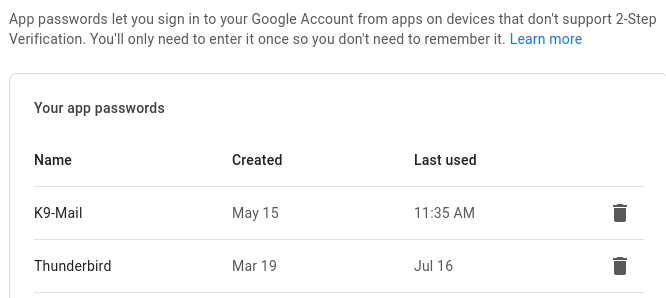
Set up Gmail App Password
Note: I am assuming that you have 2-factor authentication enabled in your account. App passwords are required only in that case. If you have not configured 2-factor authentication, I strongly advise you to do so. The best way would be to use an Authenticator app like Aegis Authenticator.
Step 3: Add Gmail account in Thunderbird
Open Thunderbird, and click on “Set Up Another Account” -> “Email”
Enter your name, gmail address, the app password generated in previous step,and then click on “Configure Manually”. We just have to make sure that the correct IMAP and SMTP addresses and ports are used.
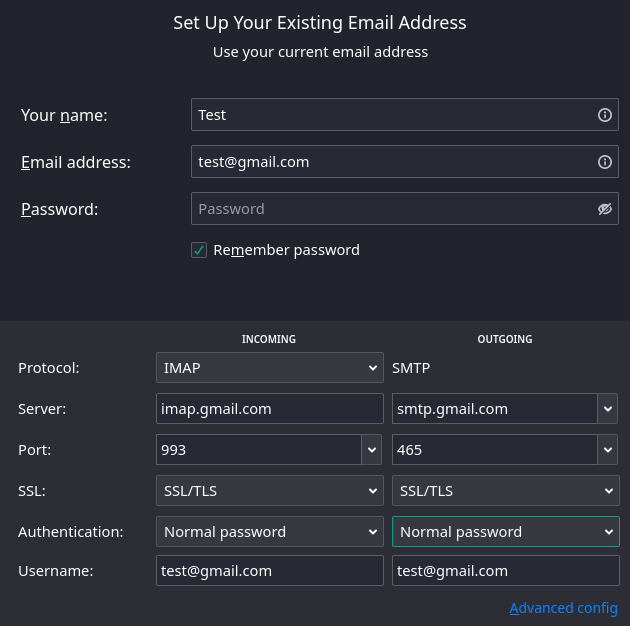
Manually configuring Gmail account in Thunderbird
Step 4: Create key-pair in Thunderbird
Thunderbird has the option of importing an existing key-pair, but for this exercise let’s just create an key-pair in Thunderbird. We can export the key in the future if we have to change clients for whatever reason.
Navigate to “Account Settings” -> <Email account you added> -> “End-To-End Encryption”
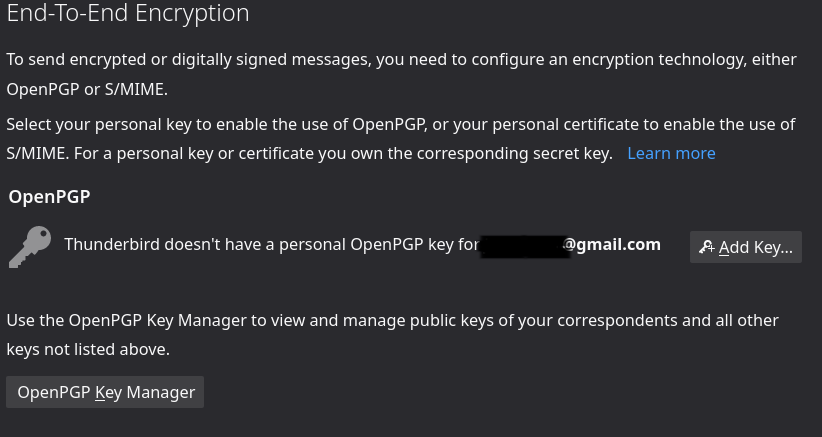
Click on “Add Key” to create/import a new key-pair.
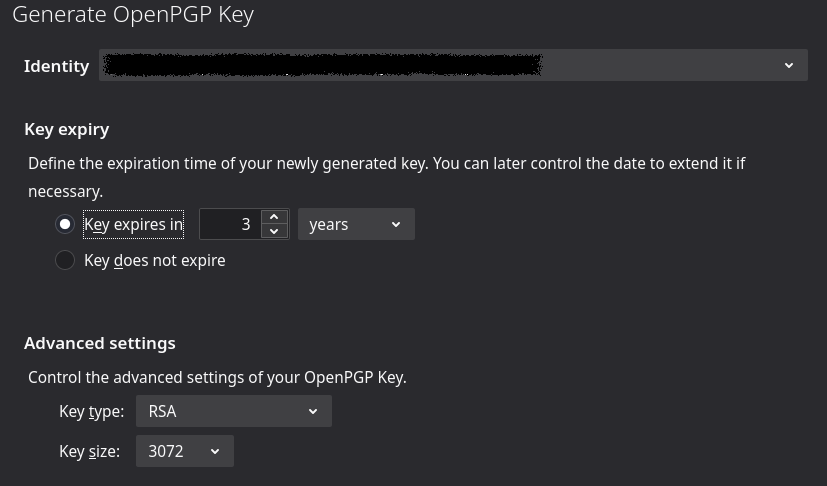
As shown above, a key pair tied to the email address can be created. Additional options are available like setting expiration date for the key. It is acceptable to set the key to never expire. We can also change the encryption algorithm and the key size. Increasing the key size makes it harder to decrypt using brute-force attacks, but generally it’s fine to go with the default settings.
Now click on “Generate Key” and we’re done!
Step 5: Sending an encrypted email using the new key
Now that we have created our key-pair, we need to exchange public keys with our recipients. There are various ways of doing this, including key servers, but let’s just send the public key as attachment in an email. To verify it’s authencity, there is a way to sign the key to generate a fingerprint. The recipient can check the fingerprint to see if the key has been tampered in transit. I’ll discuss that in another blog.
Once we have exchanged public keys with our recipient, we can import this public key in the “OpenPGP Key Manager” menu in the “End-To-End Encryption” setting we discussed earlier.
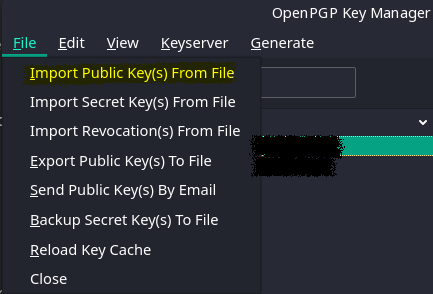
Importing public key of recipient
After we have imported the public key of the recipient, we can enable encryption using the “Security” dropdown while drafting an email.
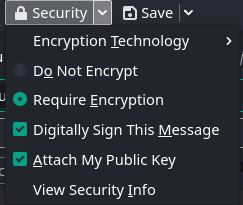
Enabling encryption while drafting an email
We can verify that public key for the recipient has been added by clicking on the “Security” button.

And that’s it! Type whatever you want and send!
Final Thoughts
This might seem a contradiction to say at this point, but is email really a secure messaging platform? The answer is No, of course not!.
We have discussed adding an encryption layer for the contents of an email, but the fact remains that metadata regarding the email is exchanged between Mail Transport Agents in a non-encrypted fashion. In short, email is not private by design. There are more secure channels of communication which does not need dependance on a service provider. Some examples are Briar and other applications like Element and Syphon, which are built on the Matrix protocol.
Thank you for reading!